Content brought to you by Auto Body Repair Network. To subscribe, click here.
What you'll learn:
- The four checks you must perform on these radar housing assemblies before a calibration procedure
- Why an AEB light may flash, even if the collision was not in the front
- How to calibrate the AEB system
Now, more than ever, malfunction indicator lamps will illuminate for seemingly no reason, with no DTC stored. You had better understand how the system being referenced strategizes or you may find yourself in for a long day.
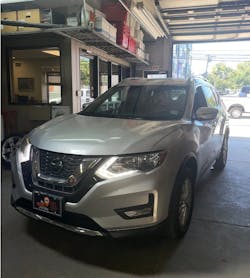
I was called to a body shop that was having issues with a 2019 Nissan Rogue with about 28,000 miles on it (Figure 1). The vehicle was involved in a minor rear-end collision, and the body shop had made all the repairs necessary, but there was an Automatic Emergency Braking (AEB) light flashing on the dash. This system was associated with the front of the vehicle and had nothing to with the rear of the vehicle (where the accident occurred), but who is to say that it was not related?
The shop thought that the vehicle needed calibration to get the light to go out since the battery had been disconnected. It is common for many shops to disconnect the battery when working on a vehicle. It is more of a safety issue to prevent electrical shorts between wires that touch one another while doing repairs on the body of the vehicle or to prevent damage to electronic components during welding procedures. The shop decided to call me in, so I could resolve the problem with the vehicle.
The initial approach
When I arrived at the shop, I noticed that the AEB Crash light was on (Figure 2), but it was slowly blinking, on and off. This light was an icon representing two vehicles together, in a collision. It was unusual because I have only seen the warning light to either be on solid for a current issue or off completely after an initial startup.
I hooked up my scan tool and was surprised to see no error codes in the system. I have seen many Toyota or Lexus products where the AEB Crash light was on steady, with no codes and a simple radar calibration was usually the fix to extinguish the fault lamp, so at this point, I decided this was the direction I was headed to resolve this flashing AEB warning lamp.
A careful visual inspection
Before setting up my calibration frame, I wanted to do a visual integrity check of the radar housing. There have been many vehicles I have inspected where the housing was compromised and after spending a lot of time setting up the calibration frame, I was unable to finish the job because there were mechanical issues with the radar unit.
There are four checks that you must perform on these radar housing assemblies before a calibration procedure:
- Hardware, a damage check. You need to grab the radar unit with your hand to see if it physically moves. I have had many units with supporting bushings, clips, and fasteners that were damaged or missing.
- The vertical check of whether the unit is inadvertently tilting down to the ground or tilting up to the sky. This can be checked with a simple bubble gauge to assure the unit is vertically level (on a level shop floor without any compromising suspension issues).
- Making sure the housing is not diagonally tilting down to the ground (on its right side or left side), and this also can be performed using a bubble gauge.
- The horizontal sway of the housing. This check requires you to see if the housing is swayed towards the right side of the roadway or the left side of the roadway and can only be done by using an angle finder.
These checks may be hard to do if the radar housing is not easily accessible, but at least you can “eye” these units up to get a rough estimate of whether the vehicle will fail the calibration procedure. If the housing is compromised in any way, that would limit the ability to adjust the housing to within specification.
Calibration equipment setup
After doing all my integrity checks, it was now safe for me to go forward with setting up my equipment and do a calibration check of the radar system. I went ahead and used my laser measuring system to find the centerline of the vehicle and grid the shop floor ahead of the vehicle to find the proper placement of my target machine.
Once I was set up, I went into the ADAS software and commanded the radar unit to aim at my target. The radar data parameter showed a reading of 2.5 degrees of vertical alignment (Figure 3). The reading was just on the edge of tolerance (+/- 2.5 degrees for this Nissan), but I always like to see a reading closer to zero degrees. Honda for example gives tight tolerances of about +/- 0.1 degrees while other manufacturers will give you a wider tolerance, such as Nissan.I like to keep the vertical adjustment as close to zero degrees as possible, so that extra tolerance can be available for changing load weights in the vehicle (for example, changing fuel tank levels and adding passengers to the vehicle).
I went ahead to adjust the radar housing to put it closer to zero degrees and aimed the radar unit to hit my target. Once again, I was able to get a much better specification of about 0.14 degrees and at this point, I was completely satisfied (Figure 4). I went a further step in calibrating the ABS yaw and steering angle sensors because the ABS module is the main arbitrator of the ADAS system, and I have seen issues if the ABS is not calibrated as part of the ADAS service.
When all was said and done, I was surprised to still see the ADAS crash light flashing (still, with no codes in memory). It is frustrating that a manufacturer would design a system without setting an error code to at least put you on a path of diagnostics to resolve issues with a computer system. At this point, you sit there twiddling your thumbs and trying to figure out what you are doing wrong. I had no other choice but to start soul searching for a resolution.
I accessed my ALLDATA subscription to see if there was any information I could find about my problem. A simple visit to its search engine, and I typed in "blinking AEB light". To my surprise, there was a service bulletin NTB 19-042C that pertained to my issue (Figure 5).
It stated that if the AEB light was blinking, and not on steady, with no codes in memory, then there was an issue with the windshield. The service bulletin also goes on to say that when contamination or foreign material adheres to the lane change camera viewing area of the windshield, or if the camera lens is fogged up, the camera will have issues processing images in the roadway. The Lane Departure Warning system will default to not put the AEB light on steady (and lacking a stored code) but rather just blink the AEB light to get your attention and provide no code at all in the system, so this issue had nothing to do with the front radar system at all.
Research goes a long way
This was all mind-boggling to me because the forward-looking camera never came across my mind as being the culprit. The bulletin specifies not to replace the camera but to clean the windshield and inspect the view area of the camera to make sure there is no glass damage (from a kicked-up stone from the roadway).
So, looking closer at this vehicle, I noticed that there was tree sap all over the vehicle and a slight mist of sap on the windshield. The owner of this vehicle was parking their vehicle under a tree and took the time out to clean part of the windshield where they needed to view clearly for driving, but the driver did not bother to clean the entire windshield, especially where the view area for the camera was.
I cleaned a small portion in front of the camera, so you can see the difference between the sap area and the area I just cleaned (Figure 6). The issue with the blinking light was there before the accident, and the fix was to completely clean the windshield and have the customer drive the car on the highway. Eventually, when the camera system was satisfied, the blinking light would go away.
I have seen manufacturers that design their windshield camera systems with warning messages on the dash if there are heavy rains, thick fog, ice, snowy conditions, or even loss of lines in the roadway from poor road maintenance or faded lines that would adversely affect camera vision. These manufacturers will store codes for these conditions that will help in accurately diagnosing a system that has failed or aborted a mission.
If you see an AEB light blinking and have Nissan experience, then you already know the strategy of that system. My question is:
Why you would not just use a LDW light to alert the driver to an issue with the Lane Departure system?
Using one warning lamp for dual systems can create confusion for a technician trying to diagnose an issue with a vehicle. The problem we have in our automotive industry is there are so many instrument panel light strategies on vehicles that it becomes a long learning curve for us, and you do not want to be too quick to change out a part in question.
There are other systems that you will encounter with the “Light’s on; nobody home” syndrome that I have learned over the years, and a few of the most common ones I see every week come to mind. Honda and Acura will not store a crash data code in its Air Bag module, so, if the SRS light is on, with no codes, you are supposed to know that it needs module replacement after a crash. Toyota and Lexus also do the same by not providing a crash code in memory but rather an SRS light on with no codes. Honda and Acura may put an ABS Stability light on with no codes, but you are supposed to know that you need to calibrate the ABS to get the light out.
So, as you can see our business becomes incredibly challenging at times, but it is up to you to research the curveballs that may be served your way. I hope this article has put your mindset in a unique perspective when tackling diagnostic work and keeps you from being too quick to replace parts. Access to information is the key to a successful diagnostic dilemma.


